
This post may contain affiliate links. If you make a purchase through links on our site, we may earn a commission. Please read our disclosure policy.

Why I Love Canned Pears
Canning can seem overwhelming. If you have never canned or preserved food in jars to be shelf-stable, you may think it’s not worth it. Growing up, my mom canned 20+ quarts of each fruit and vegetable from the garden and orchard. Why? At the time, she and my dad were able to save money from canning. Nowadays, we often choose to can for possibly the same reason, but it can also be for a hobby. When we can, we learn a new craft, and we know what goes into the food we eat.
This recipe is simple, and instead of numerous jars, it makes just four simple quart jars. Plus, there are only three ingredients. You heard me right: three!
If you want to try something new, this is the recipe to make. And if you enjoy having fresh-tasting fruit in the winter plus the knowledge of where it was made, then canning just may be for you!

Canned Pears Ingredients
The best part about this recipe for canned pears is that the ingredient list is three items long. And one of the ingredients happens to be water! That means that the pears are truly highlighted in this recipe, which is exactly how it should be when it comes to canning fruit. Here are the important ingredients:
- Pears are ripe and ready in the fall. You can use any type of pear, such as Bartlett, Red Anjou, or Bosc, but you just want to ensure they are ripe. There’s no reason to can an unripe pear. Or, if you have pears that are about to go past their prime and know that you won’t use them in time, can a batch to preserve them for future use.
- Sugar is added, but not only to add sweetness. The sugar helps preserve the color and flavor of the pears. But lest you are worried about the amount of sugar, this recipe uses a very light sugar syrup, with only a 10% sugar-to-water ratio.
The full amount of each ingredient can be found in the recipe card below.

Food safety tip – Home canning is safest when you follow research-tested recipes and proper processing times. Improper canning can risk botulism. New to canning? See my Canning 101 Guide and consult the USDA Complete Guide to Home Canning.
How to Make Canned Pears
The process for how to can pears is very simple. The longest part of the entire recipe is waiting for the pears to be water-bathed on the stove. Grab a friend or family member and get ready to can up some pears! Here are the steps for this recipe:
Step 1: Prepare the syrup – To a kettle with the water, add the sugar. Place the kettle on the stove and let it come up to a low simmer. This will dissolve all of the sugar, making a clear, lightly sugared syrup.


Step 2: Prepare the pears – To a large bowl, add water and lemon juice from half a lemon. This water will prevent the pears from turning brown once sliced. Slice each pear in half, then cut each half into thirds. If the pears are small, cut them in half rather than thirds. Remove the core and seeds. Then remove the skin, taking as little of the flesh as possible. Once fully peeled, place the piece of pear in the lemon water and finish up the rest of the pears.
Bonus Tip
An alternate way to peel the pears is to use a water bath. Take a pear and, using a slotted spoon, lower it into boiling water. Hold the pear in the water for 20-30 seconds, then remove it. Once the pear is cool enough to touch, slice it in half and then again into thirds. Using a knife, the peel should practically fall off.


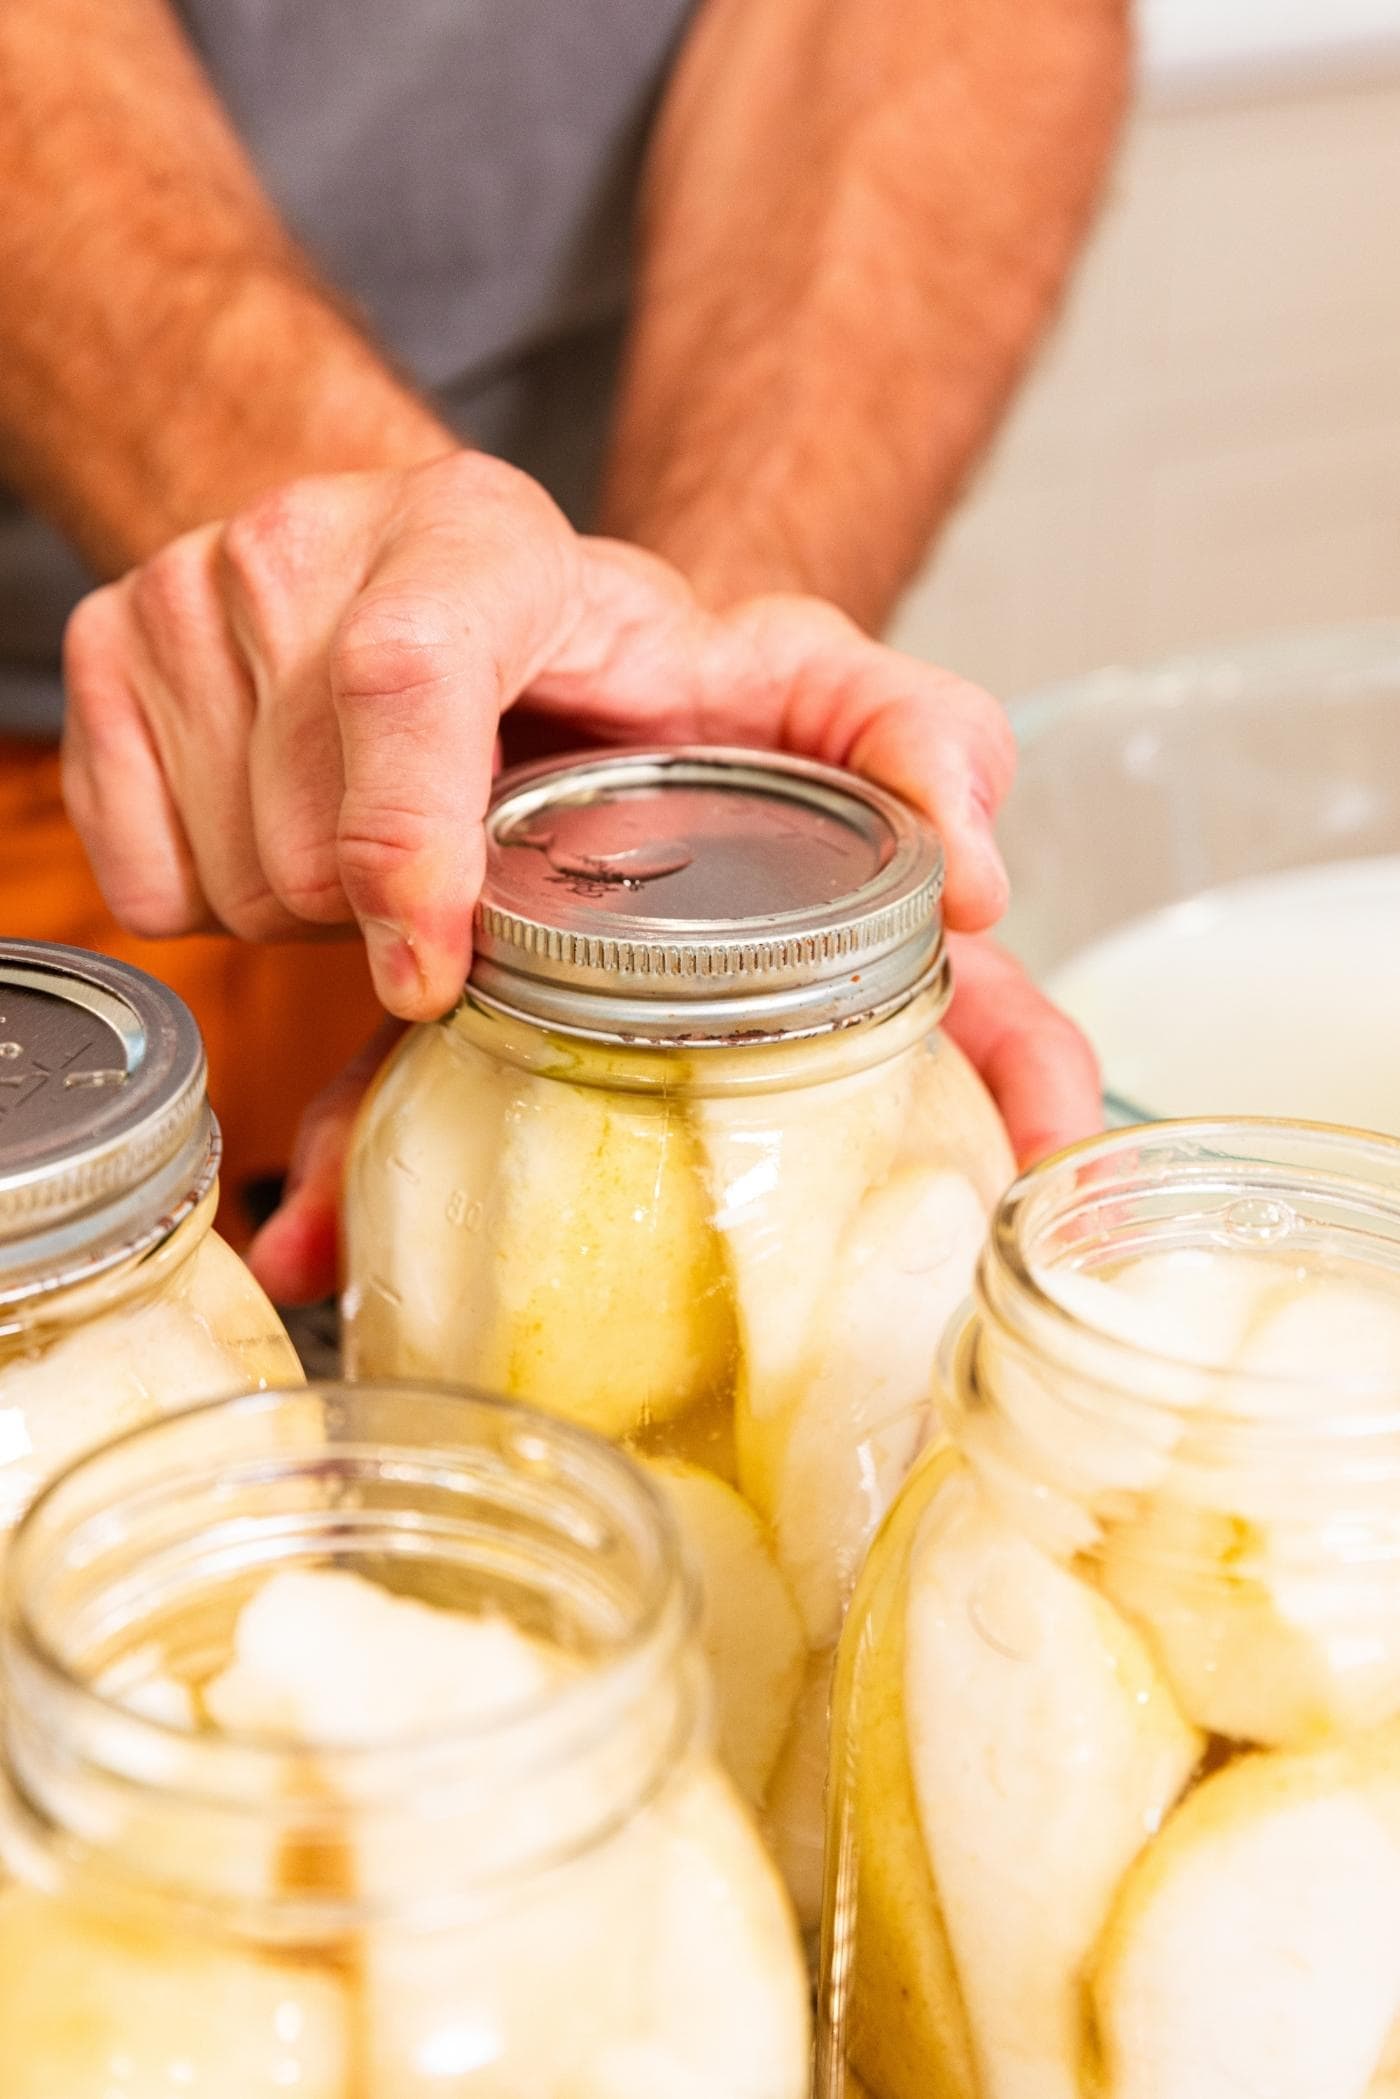
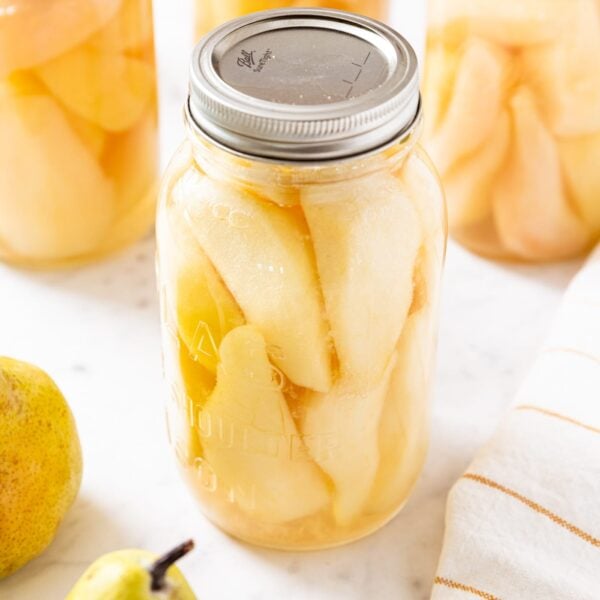
Step 3: Pack the jars with the pears – To cleaned and sterilized glass quart jars, place the pears. Fill each jar with pears, reserving ½-inch of “headspace” at the top. Optional add-in: At this point, throw in a cinnamon stick to each jar if you want a spiced pear flavor. Once all of the jars are filled with pears, using a funnel, slowly pour in the syrup, again preserving the necessary headspace. Wipe off the top of each jar with a paper towel wetted with hot water. Then place on the lid and ring, and tighten until fingertip tightness.
What is Headspace?
Headspace is the unoccupied area at the top of a jar. This space allows the contents of the jar to shift and expand during the canning process without impeding the seal created by the lid and ring. It also allows for the creation of a vacuum seal.


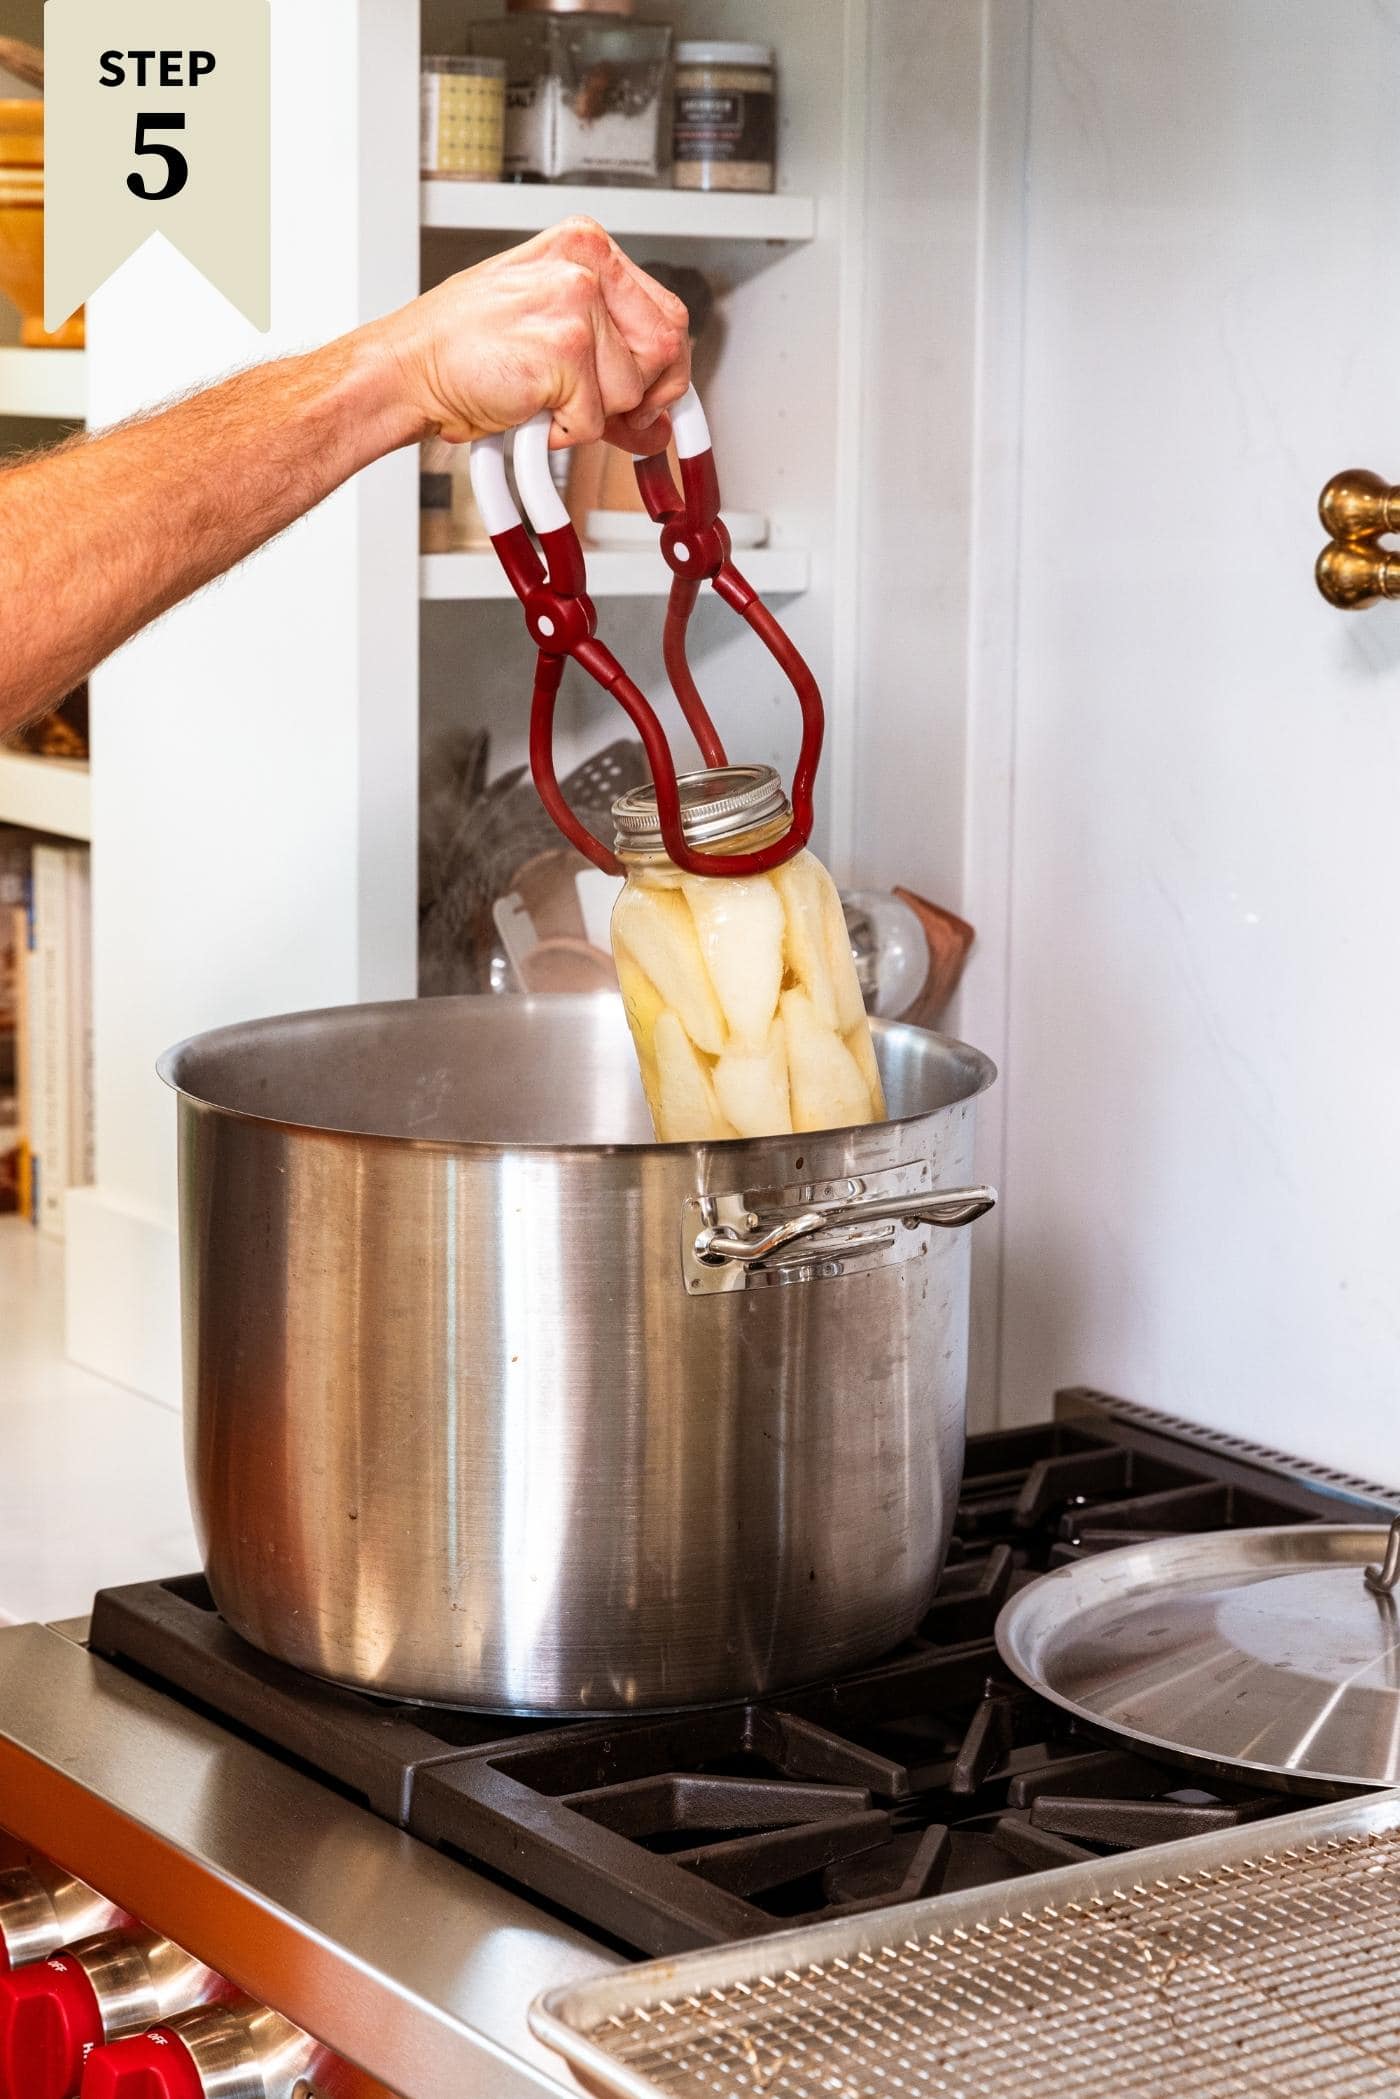
Step 4: Process the jars in the water bath – On a stovetop, heat water in a heavy-bottom kettle fitted with a rack. Using a jar lifter, place each glass jar filled with the pears into the water, one at a time. Make sure that once all of the jars are in the canner that the tops of the jars are covered with water. If they are not, simply add some hot water to the pot.


Step 5: Remove the jars from the water bath – After 25 minutes of boiling (see times below to see if you need to adjust due to altitude), remove the jars from the canner, tipping them slightly while still over the kettle to remove any water from the tops of the jars. Allow the jars to sit undisturbed for 24 hours before removing the rings. This ensures that the seal is not hindered. After 24 hours, you can remove the ring (or leave it on).
Follow These Tips
Each altitude can require a different processing time. I’m located between 0 and 1,000 feet above sea level. If you are at a different elevation, make sure to check the USDA Canning Guide for your processing time:
| Elevation | 0 to 1,000 ft | 1,001 to 3,000 ft | 3,001 to 6,000 ft | 6,000 ft + |
|---|---|---|---|---|
| Time | 25 minutes | 30 minutes | 35 minutes | 40 minutes |

Recipe Tips
- When preparing the pears, always leave a few pears unpeeled and sliced. This way, if your pears take up most of the room in the jars, you won’t be left with fruit that will turn brown quickly. Also, if you have too few fruit, you can quickly peel and slice one or two final pears to fill the last jar. It’s all about avoiding food waste.
- When choosing jars in which to can, either a regular-mouth or wide-mouth jar will work. That said, a regular-mouth jar will help to contain the pears in the juice because of the shoulder that’s built into the jar’s more narrow opening. On the other hand, the wide-mouth jars will allow those with larger hands to place the pears in the jar more accurately, but the pears will tend to float up after they’re canned.
- When filling the jars with the pears, if they are not lying correctly, simply bang the bottom of the glass jar against the palm of your hand. This provides a slight adjustment that will jostle the pears into place. I use this same technique when canning green beans, and it’s a winner!
- Do not over-pack the jars with pears. You do not want to create pockets where the sugar syrup cannot reach, which could create a breeding ground for bacteria. If there are any air pockets, use a knife to ensure the syrup breaks into the pocket.

Frequently Asked Questions
No, the USDA does not recommend canning without sugar. The sugar does have a few important tasks in this recipe: 1) it preserves the color of the pears, 2) it retains the structure of the pears, and 3) it brings out the pears’ sweetness. This recipe is made with a “light” syrup, so this is the minimal amount of sugar that can be found in a canned pears recipe.
The USDA canning guide does offer alternatives using Splenda with their tested recipes. Make sure to check out the USDA Canning Guide for more information.
Of course. Leaving the skin on the pears is not an issue and usually comes down to personal preference. With the skins on, the canned pears can become a bit tough and turn an off-color in the jar, so I prefer to remove them.
Any shape of sliced pear will work. Growing up, the wedge was the traditional shape that our family liked, so that’s what I continue to do to this day. However, the pears can be diced into smaller pieces or left in halves, if desired.
Growing up, opening a jar of canned fruit, like pears, was our after-dinner dessert. These canned pears also work great for baked goods like crisps and cakes, or can be enjoyed for breakfast with yogurt. Make sure to check out all of my pear recipes.
No, not at all. As soon as the pears are canned, they can be opened immediately.
Canned goods have a long shelf life, easily 12-18 months. Once a jar is opened, store it in the refrigerator.
More Canning Recipes
- How to can peaches
- How to can strawberry jam
- How to can blueberry jam
- How to can rhubarb jam
- How to can cherry jam
- Canned grape juice concentrate
- Slow cooker pear butter
- Slow cooker apple butter
- Slow cooker pumpkin apple butter
- New to canning? Learn what you need to know in my preserving guide.
Have I Convinced You to Make This Recipe?
I hope you make this recipe and put some food on your table. Leave a comment and share a star rating so you can let others know how much you love this recipe. This helps show others that this is a recipe they, too, can make, enjoy, and love!
Canned Pears
Equipment
Ingredients
- 10 lb ripe pears
- 6 cups water
- ⅔ cup granulated sugar
Instructions
- Have a water bath canner ready with hot water. Also, have sterilized jars with lids and rings at hand.
- Cut the pears into quarters, remove the core, and peel. Slice quarters in thirds if working with large pears or into half in working with small pears. Place prepared pears in water with 1 tbsp of lemon juice to keep them from turning brown.10 lb ripe pears
- Prepare the syrup by combining the water and sugar in a saucepan. Whisk and bring to a simmer on the stove. Simmer until all the sugar is dissolved. Once the sugar is dissolved, reduce the heat and keep the syrup warm until the jars are ready.6 cups water, ⅔ cup granulated sugar
- Once all the pears and the syrup are ready, pack the pears into the four quart jars. Pack the pears, leaving ½-inch headspace at the top of the jar. Cover the pears with the hot sugar syrup. Fill the jars and cover the pears with the syrup, retaining the ½-inch of headspace at the top of the jars. Wipe the rims clean and fit with lids and rings. Place in a boiling water bath canner, ensuring the jars are covered with water. Bring to a boil and process for 25 minutes (depending on altitude – see chart).
- Once the water bath time is completed, remove the jars from the water and allow them to cool at room temperature for 24 hours. Once cooled, ensure they are sealed and store them in the pantry for 12 to 18 months.
Video

Notes
Nutrition
Nutrition information is automatically calculated, so should only be used as an approximation.

Did you make this? Leave a comment below!

I love this kid and his beautiful home great recipes and ideas from decorating to canning ❤️🔥
Hey. I just made your canned peaches and was wondering if I can use honey instead of sugar in these canned pears and if so how much would I use?
Thank you
Can I use smaller jars?
I use pint jars, they hold about one and a half pears.
Oh I would never have thought about canning pears if it weren’t for Caleb! His instructions are easy to follow. Please note that the syrup is extremely light. You can barely taste the sugar. So adjust accordingly if you want.
Note I boiled the pairs and they were extremely easy to peel. But I left them in there probably 45 seconds too long and there was a bit of a mushy outer coating underneath the skin. So make sure you only leave them in the boiling water for about 30 seconds.
The jars look very pretty on the shelf.