
This post may contain affiliate links. If you make a purchase through links on our site, we may earn a commission. Please read our disclosure policy.

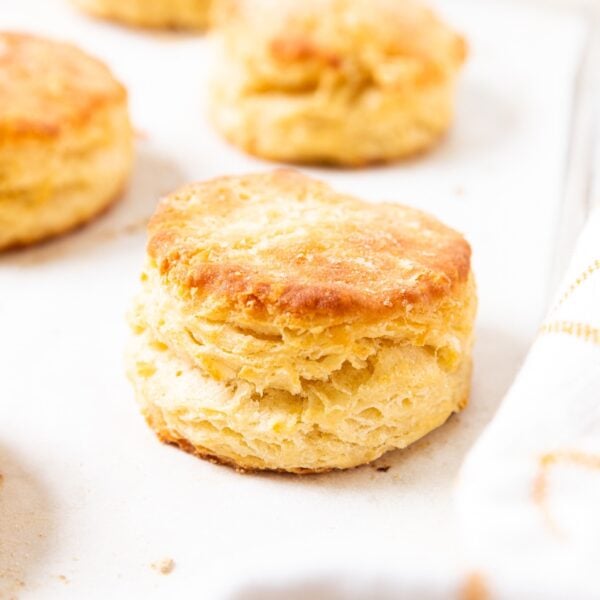
Ready For the Best Biscuits?
A good biscuit should be in everyone’s recipe box, whether physical or mental. And why is that? Because biscuits are versatile! For breakfast, have one with butter and strawberry jam. For lunch, make a sandwich with cold cuts. For dinner, serve these as a side with a good soup.
I always make these at Thanksgiving. The ingredients are simple, but the technique is important. Instead of cutting in the butter or using a food processor, the butter is grated like cheese and then frozen. Once frozen, it’s tossed with the dry ingredients. Once mixed with buttermilk, you have a biscuit dough.
During the rolling out, the dough is cut into thirds twice and stacked to create more flaky layers. These really are flaky, buttery, perfect biscuits!

Buttermilk Biscuits Ingredients
The best part of these buttermilk biscuits is how few ingredients are necessary. Only six items come together to form these flaky, delicious morsels. Here are some of the important ingredients:
- Baking powder gives you a double action. It reacts once when it’s exposed to moisture. In this case, the buttermilk. It reacts for a second time when it’s exposed to the oven’s heat, giving extra rise and fluff.
- Baking soda adds some additional leavening and helps provide a nice brown color to the biscuits.
- Butter is where the flavor is and gives all the layers. Use good-quality butter for the most flavor.
- Buttermilk has an acidity that will help the biscuits rise and give them a fluffy texture.
The full amount of each ingredient can be found in the recipe card below.

How to Make Buttermilk Biscuits
While biscuits may sound like a long, arduous process, it’s actually quite simple. A few short steps result in the flakiest, best buttermilk biscuits. Here are the steps to make this recipe:
Step 1: Combine the dry ingredients – In a large bowl, add the all-purpose flour, salt, baking powder, and baking soda. Using hands, mix everything together until roughly combined.
Step 2: Grate the butter – Using a grater, grate the butter into small pieces. Once grated, place the butter in the freezer to firm up again.


Step 3: Mix in the butter and buttermilk – To the dry ingredients, add the grated butter. Using hands, toss together the butter with the dry ingredients until all of the butter pieces are coated. Once tossed, pour the buttermilk over the top. Using a fork or a pastry cutter, mix the buttermilk into the butter and flour. The dough will look shaggy at first, which is how it should appear.


Step 4: Roll out the dough – On a well-floured surface, place the dough. Pat it together to form a disc of dough. Using a rolling pin, roll the dough out into a rectangle, roughly 10 inches by 8 inches. Then cut the dough into thirds and stack them on top of each other. Roll them out into a rectangle, roughly the same size as before. Repeat this process one more time so that the dough has been stacked on itself twice. Roll the dough out to an approximately ¾-inch thick rectangle.


Step 5: Cut out the biscuits – Using a biscuit or cookie cutter, cut out the biscuits and place them on a parchment-lined baking sheet. Once the first round of biscuits has been cut, push together the remaining dough scraps and roll them out to the same ¾-inch thickness. Cut out an additional two biscuits, resulting in 8 total biscuits. At this point, do not push the scraps but simply discard or bake them up separately.


Step 7: Brush the biscuits – Melt butter on the stove and let it cool slightly. Brush the butter onto the top of each unbaked biscuit. Then sprinkle each biscuit with a pinch of kosher salt or flaky sea salt.


Step 7: Bake the biscuits. Place the biscuits in the preheated 450°F oven and bake for 14-16 minutes. Once baked, remove them from the oven and brush with any remaining melted butter.


Bonus Recipe
For a quick cinnamon honey butter:
In a bowl, place 8 tbsp of room-temperature salted butter. Using a spatula, press and smash the butter to loosen it. Then add 1 tbsp honey and ½ tsp cinnamon and mix all three ingredients until homogeneous.


Recipe Tips
- Instead of using a food processor to chop up the butter, use a grater. A food processor can add heat to the butter, causing it to melt slightly, which is not desirable when making biscuits. Additionally, a food processor can make the pieces of butter too small. In contrast, a grater prevents heat from being added to the butter and allows you to control the size of the pieces of butter.
- The old adage is incredibly true: make it cold and bake it hot. This is incredibly important when making these biscuits and is something to continually keep in mind. The biscuits will turn out best if they are placed in the oven when the dough is cold.
- This recipe is specifically written with an amount listed for all-purpose flour to be sprinkled on your surface. Since this dough must be patted together and rolled out, an additional amount of flour is necessary. Taking this into account is important, and rather than stating an unknown amount of flour to spread on your board, use the amount indicated.
- When cutting out the biscuits, do not twist the biscuit cutter. Simply place the cutter where desired and press straight down, pulling it back up to release the biscuit. If you twist, you’ll seal in the edges, which will not make for a well-risen biscuit.

Frequently Asked Questions
This recipe is designed to use a 2 ½-inch biscuit cutter. A different size may be used, but the number of biscuits will vary.
Every time the dough is pushed together, rolled out, and cut, more flour is added, and the biscuits could become tough. Push the dough together and roll out two times in total. Bake any scraps left separately.
Yes! This is a great base dough recipe. Some sugar can be added to the dry ingredients and sprinkled on top for a sweet biscuit. Some cheese and herbs could be added to the dough for a savory pop of flavor. If looking for this type of biscuit, make sure to check out my herb cheese biscuits.
Yes! These are great to make ahead of time. After cutting out, freeze and store in airtight containers! When ready to bake, allow the biscuits to thaw in the refrigerator overnight, then bake!
Yes! Some of the crispy texture on the top of the biscuits is lost when frozen, but they are delicious once warmed up. These will store in an airtight container in the freezer for three months.
More Recipes with Dough
Have I Convinced You to Make This Recipe?
I hope you make this recipe and put some food on your table. Leave a comment and share a star rating so you can let others know how much you love this recipe. This helps show others that this is a recipe they, too, can make, enjoy, and love!
The Best Buttermilk Biscuits
Ingredients
- 2 ½ cups all-purpose flour (¼ cup reserved for the bench)
- ½ tsp kosher salt
- 1 tbsp baking powder
- ½ tsp baking soda
- 8 tbsp (1 stick) unsalted butter
- 1 ¼ cups buttermilk
Instructions
- Preheat the oven to 450°F.
- In a large bowl, combine 2 ¼ cups flour, baking powder, baking soda, and salt. Mix to combine and set aside.2 ½ cups all-purpose flour (¼ cup reserved for the bench), 1 tbsp baking powder, ½ tsp baking soda, ½ tsp kosher salt
- Grate the butter on a box grater, using the thick cut. Place the grated butter in the freezer for 15 minutes to chill.8 tbsp (1 stick) unsalted butter
- Once the butter is chilled, add the grated butter to the dry mixture and toss to combine. Pour in the buttermilk and stir to form a rough, shaggy dough. Sprinkle the reserved ¼ cup of flour onto the countertop. Dump the dough on the floured surface and use the flour on the bench to knead the rough dough into a cohesive mass.1 ¼ cups buttermilk
- Roll the dough to a rough 12-inch by 8-inch rectangle. Cut the dough into thirds and place them on top of each other. Roll out the dough into a 10-inch by 8-inch rectangle. Repeat this step one more time. On the final time roll the dough into a rectangle about ¾-inch thick. Cut six 2 ½-inch round biscuits and place them on a parchment-lined baking sheet. Push the remaining dough together, roll out to ¾-inch, and cut out an additional two biscuits.
- Brush the tops of the biscuits with melted butter and place in the preheated 450°F oven until they have risen, and are golden brown, 14-16 minutes. Once baked, remove from the oven and brush again with the melted butter.
Video

Notes
Nutrition
Nutrition information is automatically calculated, so should only be used as an approximation.

Did you make this? Leave a comment below!


I have struggled with making biscuits until I made your recipe. They came out great!. I even took a picture of them and they taste so good. Kero up the great work.
Awesome biscuits.