
This post may contain affiliate links. If you make a purchase through links on our site, we may earn a commission. Please read our disclosure policy.
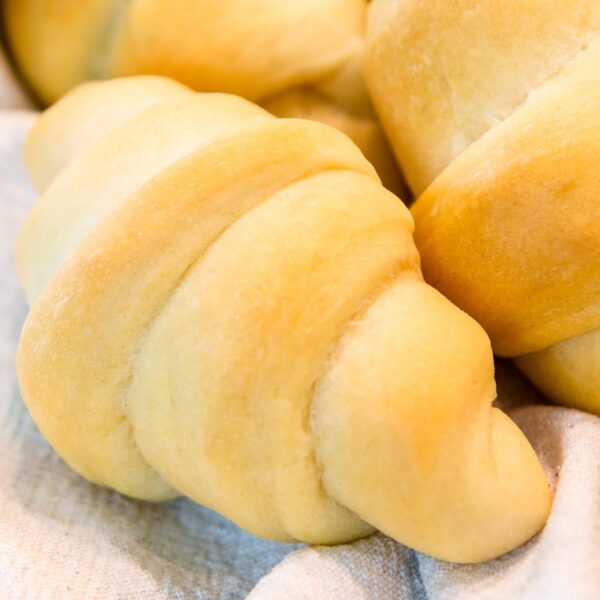
My family is so important to me. I draw so much inspiration from my mom, grandmas, and everything they have taught me. The holidays are always a time to cherish those traditional moments and dishes that bring the family together. For me, butterhorns are one of those items. First, my grandma, then my mom, have always made these for family gatherings. These are soft and light dinner rolls that are melt-in-your-mouth delicious and full of buttery flavor. They have been a family staple for years, and I hope they become one for yours as well. I love to bake with mom, and having her help me bring you this recipe was such a joy!
These freeze well and can be made one week in advance and frozen in an airtight container. Bring to room temperature and warm just before serving. These will definitely need to be passed around for seconds and probably even thirds! Enjoy the holiday season and the warm family memories it brings!

More Dough Recipes
- Beer bread
- Herb cheese biscuits
- Homemade stromboli
- No-fail dilly bread
- Easy pizza dough
- Hearty grain bread
Have I Convinced You to Make This Recipe?
I hope you make this recipe and put some food on your table. Leave a comment and share a star rating so you can let others know how much you love this recipe. This helps show others that this is a recipe they, too, can make, enjoy, and love!
Butterhorns
Ingredients
- 1 cup whole milk warmed to 180°F to 185°F
- 8 tbsp (1 stick) unsalted butter room temperature
- ½ cup granulated sugar
- 1 tsp kosher salt
- 2 ¼ tsp (1 pkg) instant yeast
- 3 large eggs beaten
- 4-4 ¾ cups all-purpose flour
- 6 tbsp unsalted butter melted (for brushing)
Instructions
- Place butter, sugar, and salt in the bowl of a stand mixer fitted with a dough hook. Pour the scalded milk into the bowl. Mix until the butter and sugar are dissolved, and the mixture cools slightly to 120°F or less, 6 minutes.8 tbsp (1 stick) unsalted butter, ½ cup granulated sugar, 1 tsp kosher salt, 1 cup whole milk
- Add beaten eggs to the warm mixture and mix. Add 4 cups flour and the instant yeast. Use the stand mixer (or by hand) and knead the dough until it is smooth and beginning to pull away from the sides of the bowl, 6-8 minutes. If the dough is sticking to the sides of the bowl and is tacky, you will need to add more flour, 1-2 tbsp at a time, until smooth.3 large eggs, 4-4 ¾ cups all-purpose flour, 2 ¼ tsp (1 pkg) instant yeast
- Once the dough clears the side of the mixing bowl and just slightly sticks to the bottom of the mixing bowl, remove the dough and knead a few times by hand on a lightly floured surface. The dough should be slightly tacky but not stick to the board while you are continually kneading.
- Put the dough in a large oiled bowl to rise. Place a damp towel (or plastic wrap) over the bowl to ensure the dough will not dry out. Put the bowl in a warm place to rise until doubled, about 1 to 1 ½ hours.
- Once risen, punch down the dough and cut it in thirds. Shape each third into a ball and punch out any air bubbles. Roll out each dough ball to a 15-inch circle (about ¼-inch thick) on a well-floured surface. Brush with melted butter, then cut into 12 triangles, as one would for a pizza. Start by cutting in quarters, then each quarter into three triangles. Take one triangle, stretch the end slightly, then roll up tightly. Pinch the ends to create a seal, then place the pinched end down on a parchment-lined baking sheet. Let the prepared butterhorns raise until they are about doubled in size (about 1 to 1 ½ hours).
- Place into a preheated 350°F oven and bake for 8-15 minutes, switching racks and watching carefully to ensure the tops and bottoms do not overbake but turn lightly golden.
- Remove from the oven and brush with melted butter. Let cool but serve warm.6 tbsp unsalted butter
Video

Nutrition
Nutrition information is automatically calculated, so should only be used as an approximation.

Did you make this? Leave a comment below!


I don’t have a stand mixer.
Can I knead this dough like I do when I make bread?
Of Course, I actually think the texture is usually better when kneaded by hand!
Really would love to try this recipe. This is my favorite roll. What is the best way to freeze these?
We have always baked them fully, let them cool and they freeze in an even layer. Once frozen you can stack them but if you stack them before frozen they will crush each other!
Hi Kaleb
So I am going to freeze mine to have ready beforehand.
Do you bake, brush butter on roll , cool and freeze ?
I’m thinking brushing butter on after reheating would be the way to go.
Thanks and Happy Thanksgiving !
I have to laugh when it said serving, 1 roll. Nope, it’s more like 5 rolls! Lol.
Wish me luck I’ll going to make butter horn rolls the day before Thanksgiving. Thank you and mom for sharing. God Bless
When I saw the video for your mom’s thanksgiving roll recipe, I knew I had to try them. Well today was the day! They are now raising, soon to be in the oven. So far, so good! If it continues to go this well, I’ll be making them from now on. Most of the time put into this recipe is waiting for them to raise. They’re so easy to make! Thank you so much for sharing this recipe.
Is this all purpose or self rising
If your recipe uses yeast, you use all purpose flour. Self rising has leveling added, and you don’t need that with the yeast.
If your recipe uses yeast, you use all purpose flour. Self rising has leavening added, and you don’t need that with the yeast.
Kaleb,
Definitely going to have to make these this year!
Thank you for mom’s recipe!
Loved the video! A great teaching skill for beginning bakers.
Teach Rachel how to make these, Kaleb! Wow! That is so exciting!
Absolutely love this video! Motivated to go bake some butterhorns now…:)
YUM, Kaleb and Jodi! Great video! Jodi, you’re a natural! I make some pretty decent butterhorn rolls, too, but mine aren’t as light as some others I’ve had, so I’ve been considering using a slightly different recipe. Now I know which one to try! My mom was a great teacher, too, so I make mine just about the same way you do. You’re right in saying that they are basically easy to make, but there are some tricks that really help. I’m sure many more people will be willing to try them after watching your video. I’m going to try your recipe next week when I make my rolls for Thanksgiving. Hopefully changing the proportions of the ingredients just a little bit will make my rolls even better and lighter!