
This post may contain affiliate links. If you make a purchase through links on our site, we may earn a commission. Please read our disclosure policy.

My Kitchen Renovation
For me, my house is my sanctuary. It’s the place I go to escape the world and all it may throw at me. It’s the place where memories are made, where I garden and cook, bake, and entertain. And while I’ve only lived in my current house for around ten years, it’s quickly become my home. Not just a house – truly a home. A home in need of a dramatic kitchen renovation!
A home evokes a feeling and a sense of belonging that other locales just can’t seem to provide. That’s why I embarked on the journey of home renovation: to create my ideal sanctuary, my idea of perfection.
I won’t lie: it was a long, arduous process. But it was well worth it in the end, as are so many things that test your very being. Dramatic? Maybe, but there were times when all I craved was my home back. Now that it is, I couldn’t be happier. And I’m excited to be able to share it with you, in the hope that it inspires you to revel in your home. If you haven’t found your “home” yet, I hope this small glimpse into mine will tide you over ’til you do!
History of My House and Property
My southeast Iowa farmhouse pre-dates 1900. As is the case with many old homes, the surviving records aren’t the best, but others in my community have dated the structure to around 1890. I do happen to know that when it was built, it was finished in more of a Victorian aesthetic, including corbels in the eaves and ornate trim work.
At some point in the course of history, most likely when the siding was updated, all the home’s original features were removed. In fact, at one time, pieces of the original woodwork were stored in the farm’s barn. Alas, the barn is no longer standing, and with it went some of the house’s exterior ornaments. To my knowledge, there is no surviving record or pictures of this period.
So the house became a modified four-square, a typical Midwestern farmhouse.
The house was purchased by my grandparents in 1980, and my parents moved in after their wedding in 1982. At that time, the house had undergone lackluster but completely expected updates. It had wood paneling on all main floor walls and a temporary drop ceiling. This was a common way to cover up the original plaster that likely needed to be replaced. All original details, including doors, hardwood flooring, and woodwork, had been stripped out and were long gone. Sigh…
My parents put in a “new” 1980s kitchen, complete with a soffit. To this day, my mom still says she thought she had the world on a string when she completed that remodel. As I was demoing the tile backsplash, she commented on how she loved the stalk of wheat imprinted on select tiles strategically placed among their plain counterparts. I’m sure it was quite the “upgrade” back in 1982.
In 1988, as my dad was taking on a larger role on the fourth-generation family farm, my parents swapped houses with my grandparents, who had lived in the larger farm’s house for years. When my grandparents moved into their “new” home, they lovingly renovated the main floor (kitchen excluded) and brought it into the 1990s. At the time, it seemed like a brand-new house!

I purchased the home in 2010. For the first nine years, I did nothing but paint and focus on the outdoors. I moved the vegetable gardens, planted new landscaping, and reshaped the entire yard. When I say the entire yard… I mean, the entire yard.
The house has always been in great condition, but it didn’t feel like it had any farmhouse soul left. I spent years dreaming and thinking about ways to not only update the house but also bring it back to its farming roots. Every other occupant had left their stamp, and it was time for me to do the same, right?!
Floor Plan
If you’ve got an eye for technical drawings, sometimes a visual representation is just easier than trying to explain everything in word form.
Use the slider below to see the floor plan before and after. If you slide to the left, you’ll see the new kitchen layout. If you slide to the right, you’ll see the old kitchen. The same footprint was preserved, but the layout was updated, revised, and improved.


The Finished Space
While the initial idea was the only renovate the kitchen, this renovation was no different than any other. When do you decide to stop? At first, I didn’t really draw a line. I had a checklist of things I wanted:
- 9-foot ceilings in the kitchen
- Wall opened between the kitchen and dining space
- Removal of the entry closet and repositioning of the front door
- New French doors leading to the back patio
- Opening between the living room and TV room
That was all the further I was going to go. But, oh, it turned into so much more. So much!
- New baseboard and trim throughout the entire space, matched perfectly with the original trim which can still be found in my second-floor rooms
- New doors to match the original doors
- Structural and cosmetic updates to my stairs
- Removal of a useless closet in the TV
- Addition of a built-in TV unit
- Replacement of the original “true” front door to match all the others
- 9-foot ceilings in the rest of the first floor
- A new electrical box and wiring throughout the first floor
I know I’m not alone with this ever-expanding list of what to fix in the house. I finally pulled the plug and applied the brakes. The first-floor bathroom and laundry will have to wait until another year (or maybe decade – ha!).
Without further ado, here are the final finished spaces:
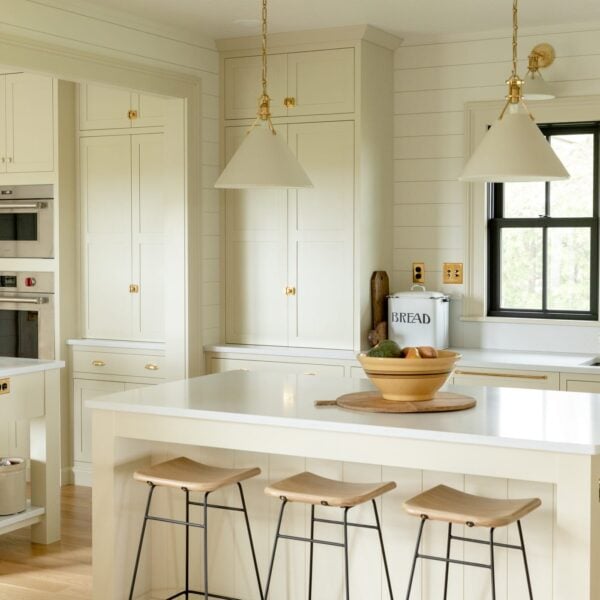
The Kitchen
I wanted an open entertaining space while still maintaining the feeling of “rooms.” Since the walls were structural, I used the casing to create this look. When guests are sitting at the dining room table, they can still interact with whoever is in the kitchen.

This is the main pantry where my glasses, plates, mugs, and even coffee maker are stored. I didn’t love the idea of always having open shelving, but I still wanted them to be accessible. So I had the doors constructed to recede into the cabinet on tracks.


I didn’t want the range to feel like it was exposed, but I also didn’t want an extra large hood. So I opted for a “column” look wherein the hood feels as though it’s touching the countertop. Rather than waste the space within each column, I had my shelves installed on either side. This is great for storing spices, oils, utensils, and so much more!
My cookbooks are readily accessible to the left of the stove along with my antique yellow and brown ware bowls. And any kitchen wouldn’t be complete without some wood cutting boards to provide warm tones.


Since the renovated kitchen isn’t overly large, I knew I wanted to “hide” my refrigerator. So panel-front it was!

Let’s face it: I have a lot of kettles. I just can’t help it! But that also meant I had to stuff them in a corner cabinet in my old kitchen. Not so with my new island. I made sure to design deep drawers complete with a peg system that would provide flexibility.

Baking Room
I’m all about designating spaces within a home. And while my kitchen isn’t large, there was something comforting in the idea that there’s a space for everything. That’s why I lovingly termed what used to be part of my mud room the “baking room.” I plan to do all my baking here, including breads, cookies, pies, you name it!

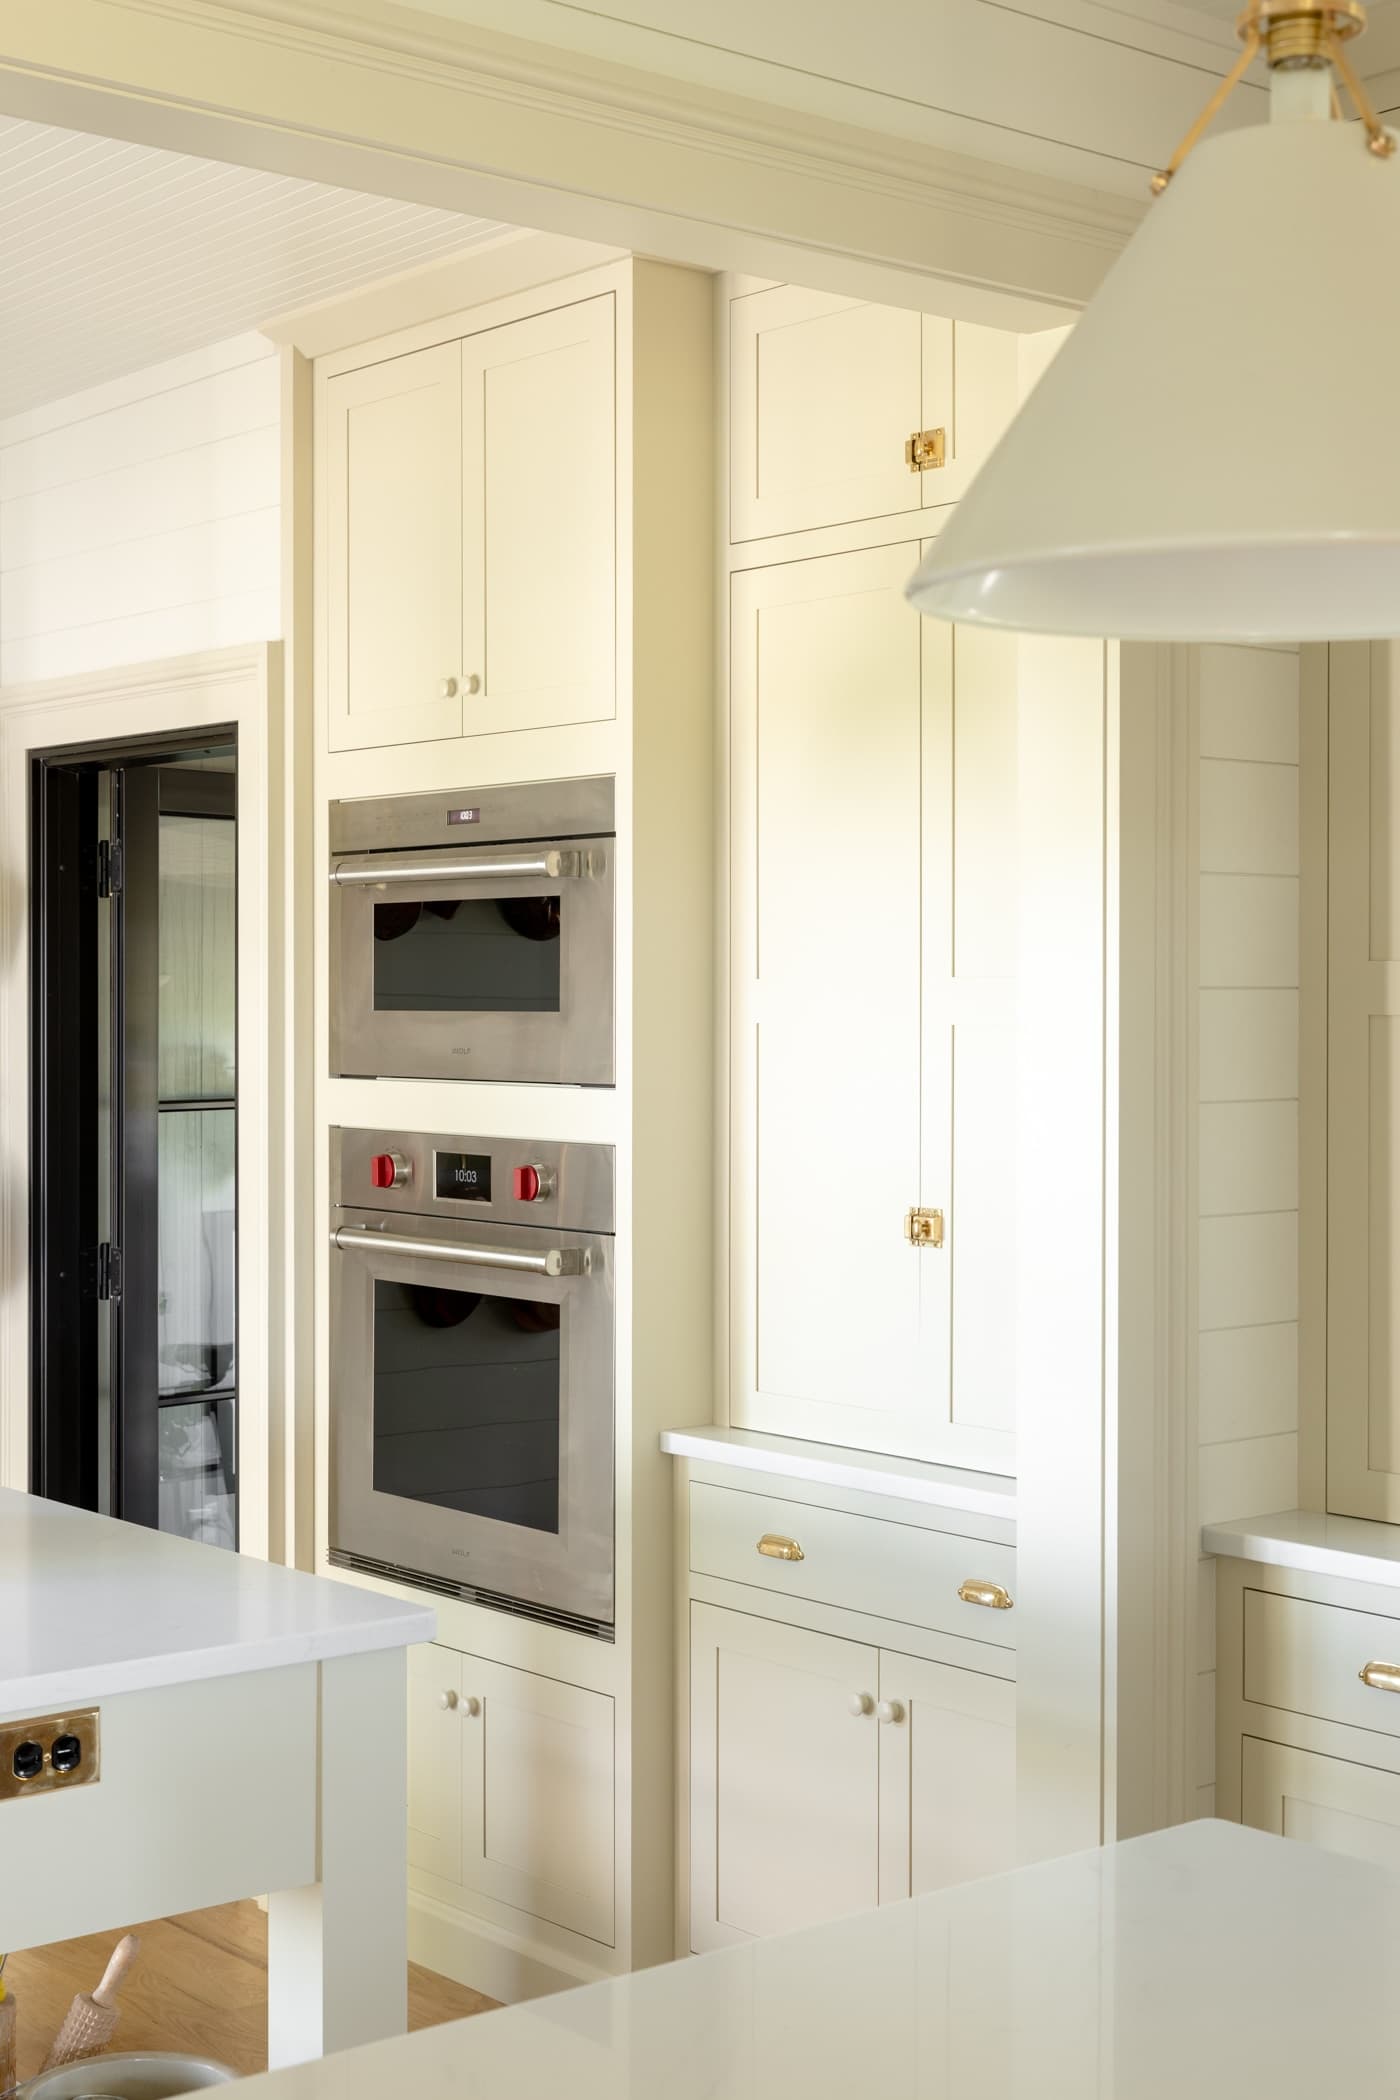
To mirror the pantry cabinet right beside it (in the regular part of the kitchen – the “cooking room” maybe?), I installed one in the baking room. This houses my mixer, flours, sugars, and extra pans. Any good baker needs an oven, so to add convenience, I added a wall oven to this room as well as a microwave.
Over the years, I’ve seemed to expand my collection of copper pots and kettles. How does that even happen?! I guess I’m a true collector at heart. I didn’t want these to be cooped up in the basement any longer, so part of my design was their own wall, compete with brass rail. These add such beautiful warm light when the afternoon sunlight shines in!

I opted for traditional farmhouse windows (in black!) and simple four-panel doors. To match my upstairs, I installed rim lock door handles that will patina and age with use and time.
For the floors, I wanted to keep things light and airy. A 3/4″ hardwood white oak with no stain was my final decision. They’ll also age and wear a bit over time, but since they’re real hardwood, I’ll be able to do a few sandings over their life.

Dining Room
My old dining room was separated from the kitchen and had a leaky bay window. I couldn’t wait to get rid of it, both for aesthetic and structural reasons. I had two large black French doors installed, leading out to the patio. In the pre-renovation kitchen, the only way I could exit to the patio was through a sliding patio door, which became harder to use each summer. These two French doors will allow for true al fresco dining, and I can’t wait to entertain this season!

It was also important to me that the dining space feel extremely open to the kitchen. This way, I’ll still be able to entertain anyone who’s over for a meal if my preparations taking longer than expected… or if the guests arrive earlier than they should!


Living Room
My living room and dining room have always been open to each other. But when the ceilings were raised to nine feet, my contractor discovered a load-bearing beam. Rather than be disappointed, I decided to make it an extra thick cased opening. Turns out, I love the look!

Entry
My previous entry was unusable. Period. No, seriously. Whenever someone would try to open the door, it would inevitably bump into the closet door that was also in the entryway. I knew it was time to gut the whole thing. Instead of keeping the door where it was (positioned to the south), I moved it to an east wall. Now, sunshine streams into this small space during the pre-noon hours.

To add functionality, a wood-topped bench was a must. I opted for white oak to match the floors. And to add durability, I went with a black slate floor, laid in a herringbone pattern with a double bond around the edge. Love it!
Oh, and the sconces! My favorite part of the entire renovation was picking out lighting, especially when it highlights artwork I’ve had for years and never been able to display! Dreams do come true, guys!

TV Room
Believe it or not, this smallish room used to be my grandparents’ bedroom. Their queen bed fit easily, and the closet (probably added in the ’90s) made it the perfect space. Due to its cozy feel, it became the TV room when I moved in.

Since I don’t need a super-deep closet in my TV room, I filled it in with a TV cabinet. Now, I know the styles of TVs change over the years, so I opted for a built-in that will change with the times. It’s a great place to display pottery, artwork, and house some of my “mess.” We all have some mess, right?

Stairs
The stairs leading to my second-floor bedrooms were bad. And I mean, really bad. At some point, a prior occupant of the house also realized the stairs were going bad. So they braced the treads from the underside. They weren’t the greatest carpenter, though, since some of the nails were actually exposed on the other side. There have been numerous times that I’ve stepped on one of these exposed nails. I’ll fill ya in: it hurts!
Instead of getting an entirely new set of stairs, my carpenter created new treads (white oak to match the floors) and veneers for the risers. And what’s the result? Practically brand new stairs… with no exposed nails. That’s a win!

What I Learned
I’ve always heard people say, “You need to build at least three houses to know exactly what you want.” In my head, I never believed anyone would actually need to do that. Who doesn’t know what they want? Now I understand why the saying.
Even though I spent years thinking about how I wanted to remodel, there were still items I didn’t plan for and things I would change. I’ve realized that you can never be too overprepared.
These are a few things I now know:
Confirm the details and communicate. I spent a lot of time and focus on finding and purchasing the perfect lighting. I love lights and couldn’t wait to find the right piece for each spot. While I went over the indoor light placements and double-checked the height of the picture lights, I forgot to go over how the outdoor lights by each door. They ended up much higher than I wanted. It’s a small loss: I had to switch the style of light I can use. I’ll survive, but I did learn an important lesson about confirming all the details.
You’ll never think of everything. I spent a lot of time thinking about the location of each electrical outlet. For someone who lives in an old house, the idea of adding outlets wherever you want is amazing. I know some of you will say “amen” to that! I also found the perfect black outlets and unlacquered brass plates. After finishing everything, I wish I would have requested they be installed in the baseboard. Yes, this is possible, especially since my replica baseboard is 11” tall. This would have lowered their visibility and given off an older, farmhouse vibe. But the moral is: you won’t think of everything and you’ll have to come to terms with that. It builds character, right?
Be prepared for perfection to evade you. For this renovation, I was my own general contractor. This hopefully saved some money, but also let some things slide that would’ve been good to address. There is a significant hump in the floor from the dining room to the kitchen. I noticed it throughout the demo and asked about it, but it never seemed to be a big deal to my subs. After everything was installed, I still notice it. And yes, I’ll live with it just fine, but I wish I had had it leveled out. When you begin the demo, you’re so excited and it’s easy to glaze over things that don’t seem like a big deal. Take time to think about each thing, even if you may seem annoying to those you’re working with. Overall, realize that perfection isn’t possible, and the quirks of an old house create a story!
Always prepare for the project to take longer. Even if it seems like no big deal, everything takes longer than you’d think. Right now, the construction industry seems to have more jobs lined up than time available. More than likely, your contractors will not be dedicated only to your project. I found this out many times with various stages of the project. Sometimes it takes a bit of coercing to get them back on-site, but remember that kindness always wins in the end.
Restoring is very different and more expensive than remodeling. While there is an obvious overlap between building something brand new and renovating something already built, restoring tends to take more time. I wanted to bring back my house’s charm and soul, and that included custom-made trim to make what would’ve been in the home when it was built. Just know that custom trim takes more time to manufacture and install.
I regret no choices in terms of product or finishes, but be warned that it definitely adds up when it comes to the budget.
It is so important to work with people who understand you and your vision. Since there was a high level of detail in the remodel, the finish carpentry work was key. Thankfully, I had amazing people who had worked with old homes and wanted me to be happy. They noticed little things before I would and made sure everything was how I pictured it. This sometimes meant removing an incorrect piece of trim and changing it. At the time, I felt bad about saying something. But if you’re always going to notice it, say something!
Watch the Tour of My Kitchen Renovation

Materials and Sources
Note: Some links contained in this post are affiliate links. Most are not. These links are for your convenience.
Paint Colors, Floors & Fixtures
- Wall color – Wool Skein at 15% strength by Sherwin-Williams | SW 6148
- Trim color – Wool Skein by Sherwin-Williams | SW 6148
- Light switch plates – Traditional Single Gang Push Button Switch Plate in Forged Brass by House of Antique Hardware | Finish: Un-Lacquered Brass // Traditional Double Gang Push Button Switch Plate in Forged Brass by House of Antique Hardware | Finish: Un-Lacquered Brass // Traditional Triple Gang Push Button Switch Plate in Forged Brass by House of Antique Hardware | Finish: Un-Lacquered Brass
- Light switches – Premium Single-Pole Push Button Universal Dimmer Switch with True Mother-of-Pearl Buttons by House of Antique Hardware | Wattage: 600W // Premium 3-Way Push Button Light Switch with True Mother-of-Pearl Buttons by House of Antique Hardware | Wattage: 600W // Premium Push Button Light Switch with True Mother-of-Pearl Buttons by House of Antique Hardware // Premium 3-Way Push Button Universal Dimmer Switch with True Mother-of-Pearl Buttons by House of Antique Hardware | Wattage: 600W // Premium 4-Way Push Button Light Switch with True Mother-of-Pearl Buttons by House of Antique Hardware
- Electrical outlets – Leviton Standard Duplex Outlet/Receptacle by House of Antique Hardware | Color: Black // Leviton Standard GFCI Outlet/Receptacle by House of Antique Hardware | Color: Black
- Electrical outlet covers – Traditional Single Duplex Cover Plate in Forged Brass by House of Antique Hardware | Finish: Un-Lacquered Brass // Traditional Double Gang Duplex Cover Plate in Forged Brass by House of Antique Hardware | Finish: Un-Lacquered Brass // Traditional Single GFI Cover Plate in Forged Brass by House of Antique Hardware | Finish: Un-Lacquered Brass
- Door hardware – Solid Brass Horizontal Rim Lock Set with Small Round Knobs by House of Antique Hardware | Finish: Un-Lacquered Brass
- Door hinges – Baldwin 1135-I Full Mortise Plain Bearing Hinge by Baldwin Brass Hardware | Finish: Non-Lacquered Brass
- Floors – 5-inch solid white oak hardwood with a natural finish
- Doors – Marvin Elevate Swinging French Door | Exterior Color: Ebony | Interior Color: Designer Black | Hardware: Matte Black | Divided Lites: Simulated Divided Lite with Spacer Bar (SDLS)
- Windows – Marvin Elevate Double Hung Window | Exterior Color: Ebony | Interior Color: Designer Black | Hardware: Matte Black | Divided Lites: Simulated Divided Lite with Spacer Bar (SDLS)
- Shiplap (on walls) – PrimeLinx Shadow Gap Shiplap by BlueLinx
- Beadboard (on ceiling) – PrimeLinx Pattern Stock by BlueLinx
TV Room
- Couch – Modern Mix Plain Back Sectional Sofa by Rowe Furniture (no longer available)
- Pillows – Zapotec Pillow by ED Ellen Degeneres Crafted by Loloi | Color: Beige/Black | Size: 22″ x 22″ | Insert: Down/Feather (no longer available)
- Chairs – Ryder Leather Chair by West Elm | Fabric: Saddle Leather, Nut
- Ottoman – Ryder Leather Ottoman by West Elm | Fabric: Saddle Leather, Nut
- Lamps – Miguel Earth Tone Southwest Rustic Jar Table Lamp by Lamps Plus
- Curtains – Basic Linen Drapery with Cotton Lining by Linenshed | Color: Natural
- Rug – Wellington Multi by Fab Habitat | Size: 8′ x 10′ (no longer available)
Dining Room
- Dining table – 1900s Boulangerie Rectangular Extension Dining Table by Restoration Hardware | Finish: Salvaged Natural (no longer available)
- Rug – Lancut Grey Indoor Outdoor PET Rug by Fab Habitat | Size: 8′ x 10′ (no longer available)
- Chairs – Carlisle High Back Dining Chair by Target | Color: Natural Metal (no longer available)
- Chandelier – Berkshire 48″ Linear Pendant with Linen Shades by Rejuvenation | Finish: Oil-Rubbed Bronze with White Linen Shades
- Sconces – Henry Sconce by Hubbardton Forge | Finish: Black | Accent: Black
Hallway
- Sconces – Ridgewood by Hudson Valley Lighting | Finish: Aged Brass | Width: 24.5″
Living Room
- Coffee table – Felicity Marble Top Coffee Table | Finish: Gunmetal (discontinued)
- End tables – Three Tier Marble End Table | Color: Gunmetal
- Rug – Lancut Grey Indoor Outdoor PET Rug by Fab Habitat | Size: 8′ x 10′ (no longer available)
- Chandelier – Berkshire Drum Chandelier by Rejuvenation | Finish: Oil-Rubbed Bronze
- Couch – Blue Tufted Maya Sofa by World Market (no longer available)
- Pillows – Dara Velvet Pillow Cover by Pottery Barn
- Curtains – Basic Linen Drapery with Cotton Lining by Linenshed | Color: Natural
Entry
- Floor tile – Black Natural Slate Tile by Rock Ridge
- Sconces – Ridgewood by Hudson Valley Lighting | Finish: Aged Brass | Width: 16.5″
- Rug – Cleary Indoor/Outdoor Flatweave Rug by Rejuvenation | Color: Cleary Rust | Size: 2′ x 3′
- Ceiling light – Siena Large Flush Mount by Visual Comfort | Finish: Hand-Rubbed Antique Brass
Kitchen
- Cabinet pulls – 3 3/4″ Classic Cast Brass Cup Pull by House of Antique Hardware | Finish: Un-Lacquered Brass
- Upper cabinet pulls – Large Cast Brass Cupboard Latch with Oval Turn Piece by House of Antique Hardware | Finish: Polished (Un-Lacquered) Brass
- Cabinet knobs – Wood knobs painted Wool Skein by Sherwin-Williams
- Dishwasher and trash pulls – Large Massey Drawer Pull by Rejuvenation | Size: 18″ | Finish: Unlacquered Brass
- Sink – Prolific 33″ Undermount Single-Bowl Kitchen Sink with Accessories by Kohler
- Sink faucet – Aged Brass ‘Ionian’ Tap by deVOL
- Pot filler – Aged Brass ‘Pot Filler’ Tap by deVOL
- Range – 36″ Dual Fuel Range – 6 Burners by Wolf
- Refrigerator – 36″ Designer Over-and-Under Refrigerator/Freezer with Internal Dispenser and Ice Maker – Panel Ready by Sub-Zero
- Wall Oven – 30″ M Series Professional Built-In Single Oven by Wolf
- Microwave – 30″ M Series Professional Drop-Down Door Microwave Oven by Wolf
- Dishwasher – 24″ Dishwasher – Panel Ready by Cove
- Countertops – Phidias by Aurea Stone
- Stools – Williamsen Counter Stool by McGee & Co | Finish: Natural & Black (no longer available)
- Rug – Cleary Indoor/Outdoor Flatweave Rug by Rejuvenation | Color: Cleary Rust | Size: 2.5′ x 9′
- Sconces – Painted No. 2 Wall Sconce by Hudson Valley Lighting (with Mark D. Sikes) | Finish: Aged Brass/Off White
- Pendants – Painted No. 2 Pendant by Hudson Valley Lighting (with Mark D. Sikes) | Finish: Aged Brass/Off White
- Gallery rail – Brass Gallery Rail by Paxton Hardware | Length: 72″


Beautiful remodel…
Where is your kitchen oriental looking rug from? Or is it a true oriental rug? new or vintage?
thx, margie