
This post may contain affiliate links. If you make a purchase through links on our site, we may earn a commission. Please read our disclosure policy.

Why I Love to Make This Bread
I shy away from sharing bread recipes unless they are easy and nearly failproof. Making bread takes time, ingredients, and energy. If it doesn’t turn out well, it is a letdown. That is why this overnight sourdough is my new favorite. Sourdough traditionally is a starter that is fermented over time with feedings of flour and water to develop a nuanced flavor. The start can take time, and it needs to be fed daily.
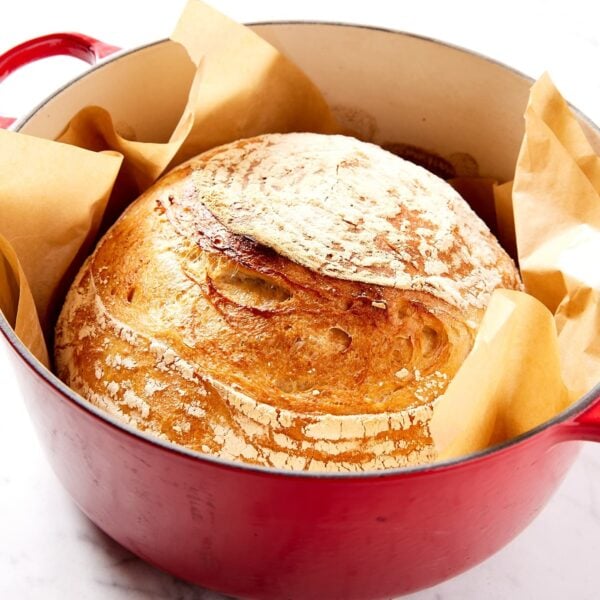
This recipe is different. Here I start with a poolish, a different type of start with a small amount of yeast and equal parts flour to water. The mixture sits overnight to develop flavor. The next day, more flour, water, and salt are added to create a wet dough. After folding and rising, the bread is baked in a hot Dutch oven to give the artisan-style crust. This bread is worth the time and will become a staple.

Overnight Sourdough Bread Ingredients
- Instant dry yeast is different than active dry yeast. Instant yeast can be added to the flour and does not need to be bloomed.
- Bread flour has a higher level of protein than all-purpose flour. All-purpose flour can work, but it will change the texture slightly.
- Wheat germ is added to add a heartier wheat flavor to the bread.
- Kosher salt is essential to bring out flavor in the bread. Without salt, the bread would be flavorless.
The full amount of each ingredient can be found in the recipe card below.

How to Make Overnight Sourdough Bread
Step 1: Create the poolish – In a small bowl, combine the flour and yeast together. Add the water and whisk. Cover and let sit for a minimum of 6 hours, but ideally 8 hours.


Step 2: Create the dough – Add the poolish to a stand mixer bowl. Add in additional flour and yeast. Add in the water and wheat germ. Using the dough hook on the mixer, mix until it is combined. Add the salt and mix until it has worked into the bread.


Step 3: Let the dough rise – Oil a bowl and place the dough in it. Cover and let rise. Occasionally, fold the dough into itself. Fold three separate times during the first 90 minutes, making four folds each time. After the third time, continue to let the dough rise until it has doubled in size.


Step 4: Allow the dough to rise again – Heavily coat the inside of a proofing bowl with flour. Knead the dough, pushing the air bubbles out of it. Add to the proofing bowl and coat with flour. Cover and let rise an additional hour. Meanwhile, place a Dutch oven in the oven and set it to preheat to 475°F. Let the Dutch oven preheat for 1 hour.


Step 5: Bake the bread – Lightly flour a large sheet of parchment paper. Using your hands to hold the dough, flip the proofing bowl upside-down and lay it in the center of the parchment paper. Using a bread lame or sharp knife, create a deep relief cut across the top of the dough. Lift the parchment paper and gently lower the dough into the hot Dutch oven. Place four ice cubes on the outside of the paper, touching the Dutch oven. Cover and bake for 30 minutes. Remove the lid and bake for an additional 15-20 minutes until the bread has reached an internal temperature of 205°F to 210°F. Remove the bread from the Dutch oven to cool.


Recipe Tips
- Using high-protein flour works best for this recipe. Bread flour works best, but all-purpose can also work. Some versions of all-purpose flour also contain high levels of protein, depending on the brand.
- Adding salt later is important to make the bread rise properly. Salt can inhibit yeast, so it needs time to work into the dough. Adding the salt later allows it time to do so.
- Folding the dough during the initial rise allows the bread to develop its structure. It pushes the protein strands to stretch out and develop further.

Frequently Asked Questions
Regular active yeast can work with this recipe. Active dry yeast would need to be added to the water in the poolish and allowed to bloom before adding the flour.
Yes, it will take more elbow grease without a mixer, but it will still work.
Yes, the proofing bowl helps shape the loaf, but a similar-sized bowl can work. The bowl will need to be lined with a cotton towel that is heavily sprinkled with flour so the dough does not stick.
As with most bread, this is best fresh. To keep fresh, slice and store the leftovers in the freezer, only thawing what is going to be used.

More Bread Recipes
Have I Convinced You to Make This Recipe?
I hope you make this recipe and put some food on your table. Leave a comment and share a star rating so you can let others know how much you love this recipe. This helps show others that this is a recipe they, too, can make, enjoy, and love!
Overnight Sourdough Bread
Ingredients
For the poolish
- 1 cup bread flour
- 1 ½ tsp instant dry yeast
- 1 cup warm water
For the bread
- 3 ½ cups bread flour
- ½ tsp instant dry yeast
- 3 tbsp wheat germ
- 1 cup water
- 1 ½ tsp kosher salt
Instructions
- Prepare the poolish: In a bowl, combine the flour and instant yeast. Stir and add the warm water. Mix to combine and dissolve the yeast. Cover and allow the poolish to ferment for 8 hours.1 cup bread flour, 1 ½ tsp instant dry yeast, 1 cup warm water
- For the bread: In the bowl of a stand mixer, combine the poolish, bread flour, instant yeast, wheat germ, and water. Mix on low until the dough is combined, 4-6 minutes. Add the salt. Mix on medium until the salt is incorporated, 2-3 minutes. The dough will be sticky and wet.3 ½ cups bread flour, ½ tsp instant dry yeast, 3 tbsp wheat germ, 1 cup water, 1 ½ tsp kosher salt
- Place the dough in a well-oiled bowl. Cover and allow to rise in a warm place for 1 ½ hours. During the resting and rising, stretch and fold the dough three times. Think of the dough as a compass with four quadrants: north, east, south, and west. Starting with the north, grab the dough with oiled hands. Stretch it up towards the sky and fold it over the dough to the south. Repeat with each quadrant. After 1 ½ hours, on the final stretch and fold, cover the dough and allow it to rise until it is doubled, 1-1 ½ hours.
- Once doubled, punch and knead the dough into a ball. Prepare a proofing bowl with plenty of flour and place the smooth side of the dough ball down in the bowl. Flour the top and cover. Set the bread aside to rise for 1 hour.
- During the rise, preheat a Dutch oven in a 475°F oven. After an hour, remove the Dutch oven from the heat.
- Turn out the bread onto a piece of parchment paper. Make a ½-inch deep half-moon cut in the top of the bread and carefully use the parchment to set the bread into the hot Dutch oven. Add 4 ice cubes to the Dutch oven and cover with the lid.
- Return to the preheated 475°F oven and bake covered for 30 minutes. Remove the cover and bake until the crust is golden brown and the internal temperature of the bread reaches 205°F to 210°F, 15-20 minutes. Remove the bread from the oven and set on a cooling rack to cool before slicing.
Video

Notes
Nutrition
Nutrition information is automatically calculated, so should only be used as an approximation.

Did you make this? Leave a comment below!


Kaleb, this is my go-to bread recipe (abd I have tried many over the years). I absolutely love it. Don’t normally add wheatgerm, but only because I never get round to buying it!!. Still fab, though. Just trying today with 1 tbspn of oatbran as an AI-recommended substitute, so, fingers crossed.
Kaleb, I have made this bread a few times, absolutely delish, perfect crumb and tender inside. Today, I chopped Kalamata olives and added it in the dough. It was also amazing.
I do have a question? After mixing the dough, if it is put in the fridge a few days, will it taste more like Sourdough? I stink at making starters, but my son should only eat sourdough breads.
This turned out great! I saved the recipe for future use- everyone loved it. The crust has the perfect chew and nice crisp! Thanks for sharing.
So easy and so delicious!
I have made this beautiful, easy simple sourdough several times, it is the best!
I made the Overnight sourdough bread and we absolutely love it, it came out perfect but I had to get up at 5 AM to start it so that we could have it for dinner. For the amount of time required for the Poolish, you mentioned 6 to 8 hours, minimum of six, what is the maximum amount of time, 8 to 12 hours?
I made the bread and we absolutely love it, it came out perfect but I had to get up at 5 AM to start it so that we could have it for dinner. For the amount of time required for the Poolish, you mentioned 6 to 8 hours, minimum of six, what is the maximum amount of time, 8 to 12 hours?
Can you tell me which model is your Kitchen Aide mixer I like the glass bowl.