
This post may contain affiliate links. If you make a purchase through links on our site, we may earn a commission. Please read our disclosure policy.

The Perfect Thanksgiving Turkey
Turkey seems like a make-or-break for Thanksgiving. Really, we put a lot of pressure on roasting a large piece of meat that many have never had any experience in making. Then once it is roasted, we worry if it is too dry, flavorless, or even worth the effort. This recipe should calm any fears. This is for the first-timer who wants to impress guests, and this is for the experienced cook who wants to hone their skills. This is a classic turkey using an easy dry brine.
To understand why I love dry brining, first, you need to understand what a brine is. Brining is simply adding salt to meat and allowing a certain amount of time for the salt to season the meat. There are two ways to brine: wet and dry.
- A wet brine is salt and aromatics mixed with water. The meat is submerged in the water solution and stored in the refrigerator to brine.
- A dry brine is the same mixture of salt and aromatics, but with no water. A dry brine takes less refrigerator space and helps the salt have closer contact with the meat. The mixture is rubbed onto the meat and allowed to brine in the refrigerator for a certain amount of time. During that brining, the salt seasons the meat and helps the meat hold onto the natural juices. The salt brings the spices and herbs into the meat and allows for more flavor.
This is a simple but effective way to ensure you will have a perfect Thanksgiving turkey.

Dry Brine Turkey Ingredients
- Turkey, specifically an unbrined turkey, is an obvious necessity. Choose any size that accommodates the number of guests and adjust the salt as the recipe shows.
- Sugar will help to give the turkey a beautiful, golden hue while it’s roasting. Just a small amount makes a difference in a well-seasoned and evenly browned turkey.
- Kosher salt is larger-grained than table salt. This recipe is designed for kosher salt, which measures differently. Make sure to use the correct amount of salt if adjusting.
- White wine is mixed with melted butter and used to baste the turkey. The wine offers a slightly sweet acidity. Choose a dirty white wine like Sauvignon Blanc.
- Butter adds flavor during the basting and encourages the turkey’s brown color.
- Carrots, celery, and onion are added to the bottom of the roasting pan. The vegetables mix with the turkey’s juices and create flavorful drippings used to make gravy.

How to Make a Dry Brine Turkey
Step 1: Prepare the dry rub – In a small skillet, combine the coriander seeds, black peppercorns, fennel seeds, mustard seeds, and bay leaves. Place the skillet over medium-low heat and allow the spices to toast for 4 to 6 minutes. Shake the pan every so often to ensure the spices do not burn. Once toasted, pour the spices into a mortar and crush them with a pestle. Alternatively, a spice grinder or coffee grinder can be used. Once crushed, add the freshly chopped sage, thyme leaves, sugar, and salt. Mix everything together until well incorporated and set aside.
How much salt is needed? You’ll need 1 tablespoon of kosher salt for every four pounds of turkey. For example, for a 12-pound turkey, three tablespoons of kosher salt will be needed.


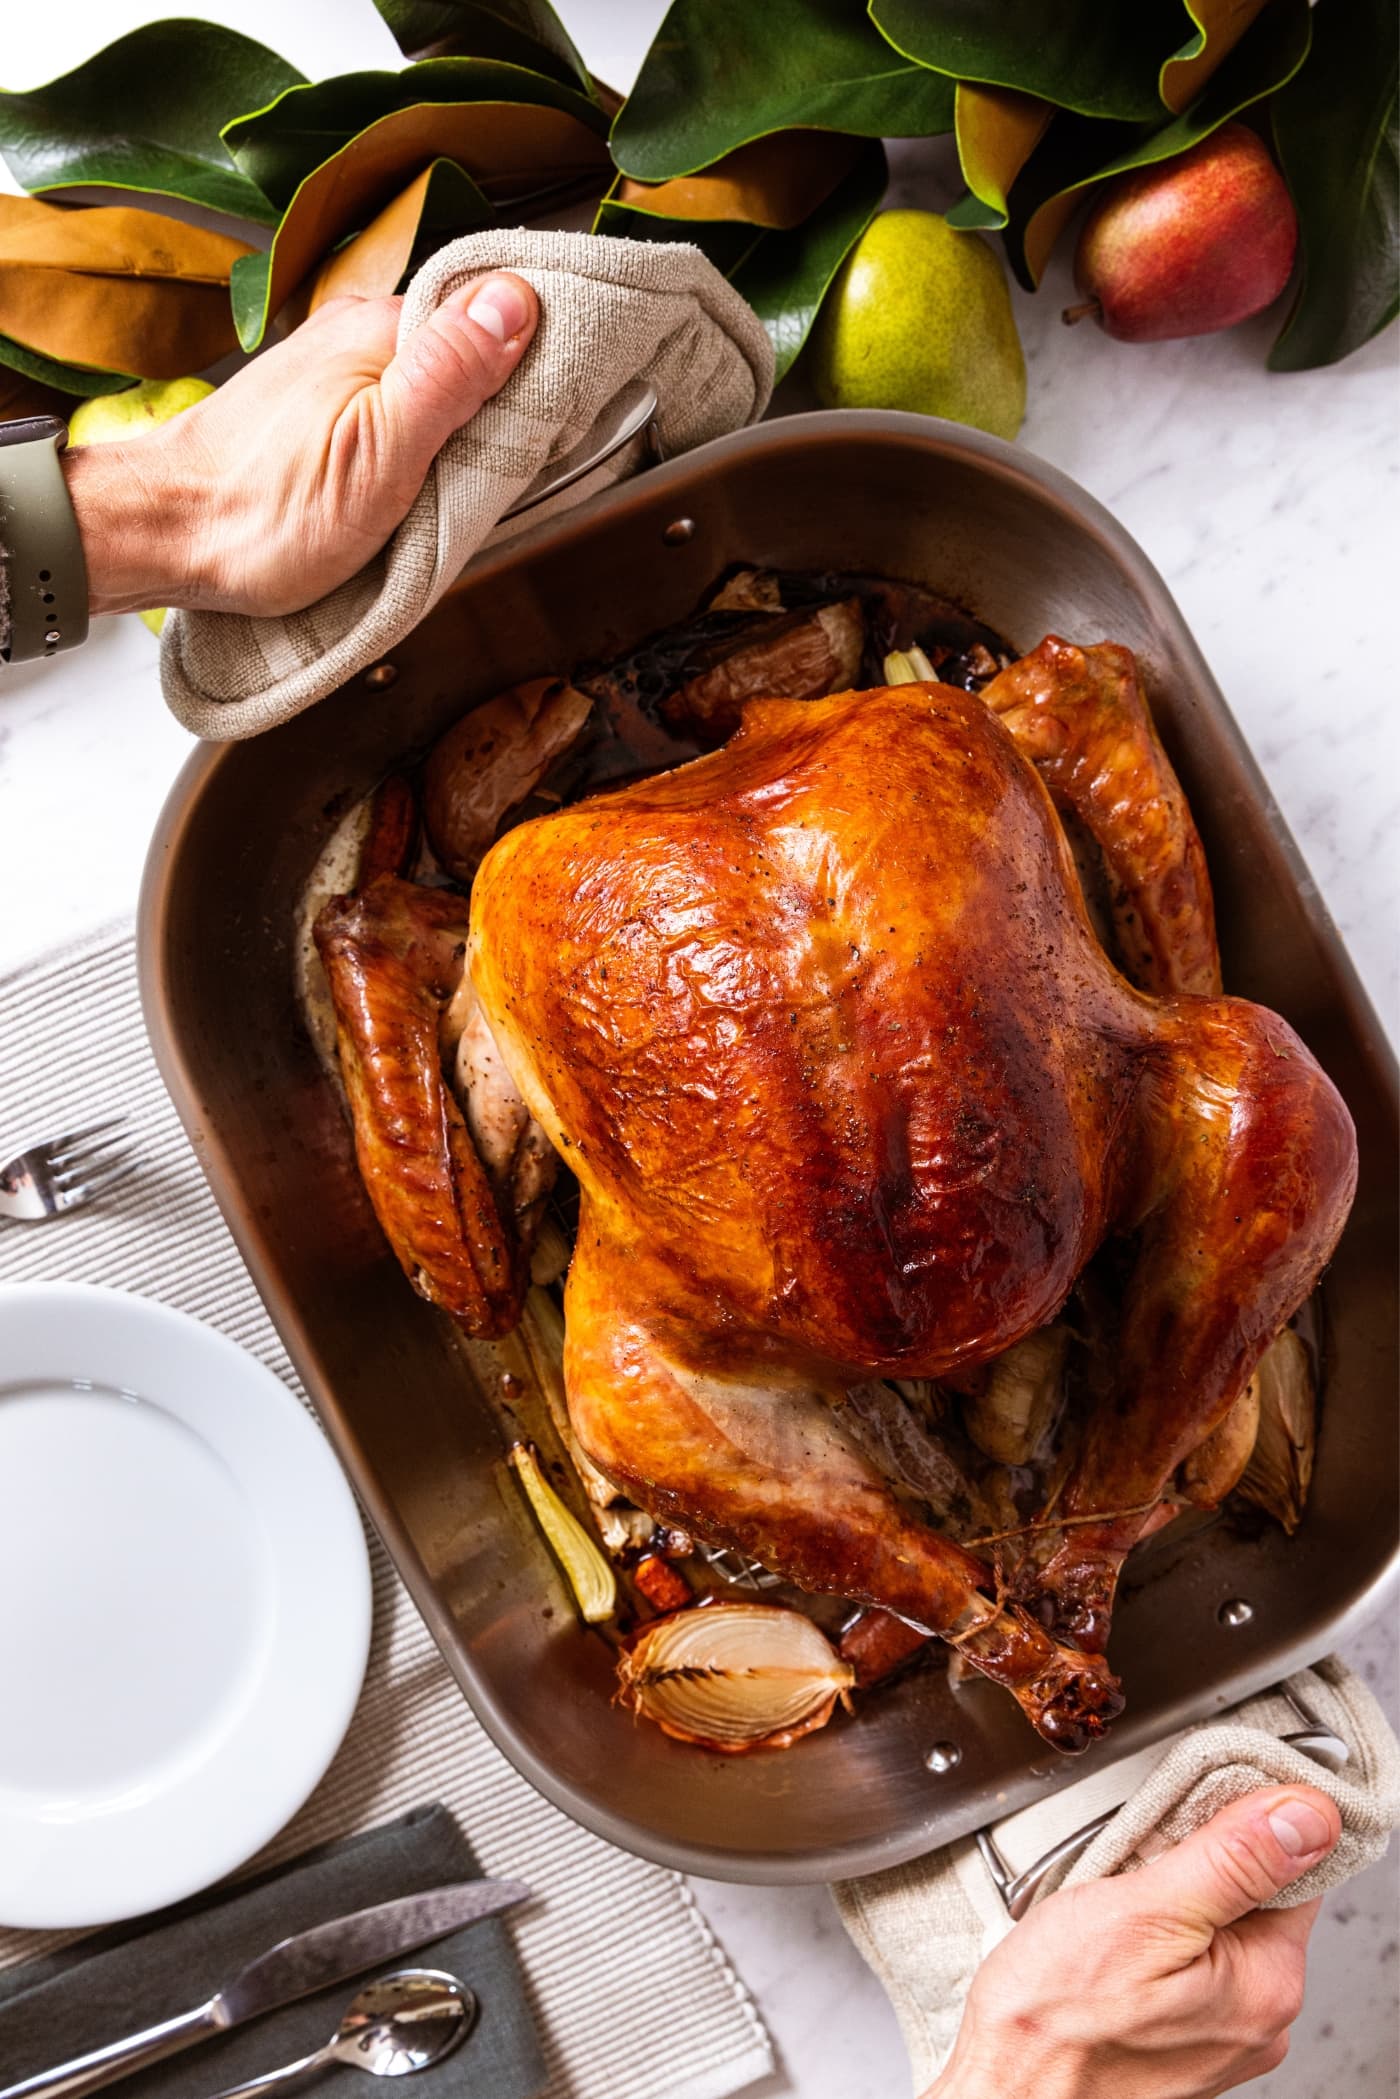
Step 2: Prepare the turkey – Remove the neck and giblets from the turkey and use them for another purpose (such as your stuffing or gravy). Ensure the turkey is fully thawed (see thawing times below) by thawing in the refrigerator. Remove any excess skin, such as the skin around the neck and the tail. These extra pieces can be discarded or used for turkey stock. Sprinkle on the dry brine, covering the entire turkey, including the bottom and cavity. Use your hands to work the salt into the meat. Once completely covered, place the turkey back in the refrigerator uncovered to brine for at least 8 hours and up to 24 hours.
How long does a turkey take to thaw? Due to the size of a turkey, thawing takes time. To thaw, place the turkey in the refrigerator and allow one day of thawing time for every four pounds of turkey weight.


Important Tip
Make sure to always wash your hands with soap and water when working with raw meat!
Step 3: Prepare the basting liquid – Using butcher’s twine, tie together the fresh sage and fresh thyme and place them in a kettle along with the butter. Heat it on the stovetop over medium-low heat to begin melting the butter. While melting, pour in the white wine. Once all of the butter has melted and the mixture has simmered to let the herbs infuse, remove it from the heat.


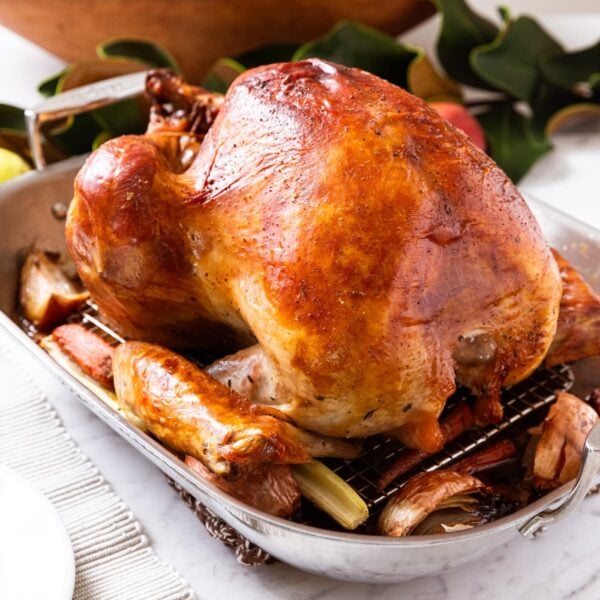
Step 4: Fill and truss the turkey – Place the head of garlic, half an onion, and some chopped carrots and celery in the turkey’s cavity. To the roasting pan fitted with a wire rack, add the remaining roughly chopped celery, carrots, and onion. Then take the two legs of the turkey and truss them together using butcher’s twine. This will prevent the legs from opening too much while baking. Place the turkey on top of the roasting pan rack and twist the wings under the breast of the turkey. This will prevent the tips of the wings from burning.


Step 5: Cover the turkey with cheesecloth – Cut four layers of cheesecloth large enough to cover the entire turkey’s breast and partway down the thigh. Place the cheesecloth in the basting liquid and allow it to become fully saturated. Then place the wet cheesecloth over the turkey. Before placing it in the oven, baste the turkey to ensure the cheesecloth is completely saturated.


Step 6: Bake the turkey – Place the turkey in the preheated 425°F oven. After 30 minutes, turn the oven temperature down to 375°F and continue baking. Every 30 minutes, remove the turkey from the oven and baste with some of the basting liquid. Keep the basting liquid warm on the stove while the turkey is baking so that the butter does not congeal. When there is one hour left, remove the turkey from the oven and remove the cheesecloth. Baste the turkey and place it back in the oven to finish roasting. Continue basting every 15 minutes for the last hour. Once done roasting, remove it from the oven and allow it to sit for 20-30 minutes before slicing. Then slice the turkey and serve.
When is the turkey done baking? Roast until the breast registers 160°F and the thighs register 170°F. Once the turkey is at the correct temperature, remove it from the oven and allow it to rest for 20-30 minutes. The turkey will continue to roast from the residual heat, bringing the breast to 165°F and the thighs to 175°F.


Recipe Tips
- When toasting the spices in the skillet, make sure to shake the pan every so often. This will displace the spices and prevent them from burning on the bottom of the pan.
- Make sure to let the turkey sit with the dry brine for as little as 8 hours and up to 24 hours. The longer the turkey sits with the brine, the more flavor will make its way into the meat, so aim for letting it brine for 24 hours.
- Do not cover the turkey while it is dry brining. Leaving it uncovered will cause the skin to dry out slightly while in the refrigerator, and it is essential to get perfectly crispy and beautiful skin.
- For the carrots and onion that go into the roasting pan, leave the skin and peel intact. Since these will not be consumed but are simply added for flavor, there is no reason to take the time to peel them.
- Make sure to bake the turkey using a rack that lifts it off the bottom of the roasting pan. If the turkey’s skin is in contact with the bottom of the pan, it may get soggy. Using something that lifts it off the bottom allows heat and air to encircle the turkey, creating an even roasting environment.
- Once the turkey is done baking, make sure it is allowed to sit for 20 to 30 minutes before it is sliced. This will allow the juices in the turkey to settle as the turkey finishes baking and cools slightly.

Frequently Asked Questions
Yes, a good substitution for white wine is turkey or chicken stock. The stock will flavor the drippings and meat wonderfully.
Yes! Many love these caramelized vegetables. I love to blend some of them into the gravy for a rich flavor.
Cheesecloth is available at most kitchen stores or online (affiliate link). But the cheesecloth does not have to be used. The turkey will tend to burn and dry out, so you may need to tent the turkey with tin foil while baking.
Any leftover meat is perfect stored in the refrigerator and used for meals or recipes after Thanksgiving. The meat will last up to 10 days in the refrigerator, or it can be frozen for longer storage.

More Thanksgiving Recipes
Have I Convinced You to Make This Recipe?
I hope you make this recipe and put some food on your table. Leave a comment and share a star rating so you can let others know how much you love this recipe. This helps show others that this is a recipe they, too, can make, enjoy, and love!
Classic Dry Brine Turkey
Ingredients
- 12-18 lb turkey
- 1 ½ tsp coriander seed
- 1 tbsp black peppercorns
- ½ tsp fennel seed
- 4 bay leaves
- 1 ½ tsp mustard seed
- 1 tbsp minced fresh sage
- 2 tsp fresh thyme leaves
- 1 tbsp granulated sugar
- 1 tbsp kosher salt per every 4 lbs turkey (example: 3 tbsp for a 12 lb turkey)
- 4 ribs celery roughly chopped
- 4 carrots roughly chopped
- 1 large onion skin left intact and chopped into quarters
- 1 head garlic chopped in half
For the basting liquid
- 24 tbsp (3 sticks) unsalted butter
- 6 leaves fresh sage
- 3 sprigs fresh thyme
- 1 bottle (750 mL) dry white wine
Instructions
- Combine the coriander, black peppercorns, fennel seed, mustard seeds, and bay leaves in a small skillet. Set the mixture over medium-low heat. Stir the mixture until the spices are fragrant and toasted, 4-6 minutes. Once they are toasted, remove the skillet from the heat. Add the spices to a mortar and grind them into a coarse powder. Alternatively, the spices can be ground in a spice grinder. Once the spices are ground, add the minced sage, thyme leaves, sugar, and salt and mix to combine.1 ½ tsp coriander seed, 1 tbsp black peppercorns, ½ tsp fennel seed, 4 bay leaves, 1 ½ tsp mustard seed, 1 tbsp minced fresh sage, 2 tsp fresh thyme leaves, 1 tbsp granulated sugar, 1 tbsp kosher salt per every 4 lbs turkey (example: 3 tbsp for a 12 lb turkey)
- Remove the giblets and neck from the thawed turkey and set the turkey on a small rimmed baking sheet that will catch any juices. Rub the salt mixture over the entire turkey, including the cavity. The salt mixture can also be rubbed underneath the skin. Once the salt is all used on the turkey, set the turkey in the refrigerator uncovered for 8 to 24 hours, with 24 hours being ideal. Leaving the turkey uncovered allows the skin to dry out and become crisp during roasting.12-18 lb turkey
- After brining, preheat the oven to 425°F.
- In a medium saucepan, combine the butter, white wine, sage, and thyme and set over medium-low heat to melt the butter.24 tbsp (3 sticks) unsalted butter, 6 leaves fresh sage, 1 bottle (750 mL) dry white wine, 3 sprigs fresh thyme
- In the bottom of the roasting pan fitted with a wire rack, lay the prepared celery, carrots, onion, and garlic. Place the turkey on the rack with the breast facing up. Bend the wings forward and underneath the breasts, protecting the tips from the heat. Tie the legs together with butcher's twine.4 ribs celery, 4 carrots, 1 large onion, 1 head garlic
- Once the butter is melted, soak four 16-inch square pieces of cheesecloth in the butter mixture. Lay the soaked layers of cheesecloth over the breast of the turkey and down the sides, roughly covering halfway down the thighs. Baste more butter onto the cheesecloth as needed to ensure it is saturated.
- Place the turkey in the preheated oven. Roast at 425°F for 30 minutes and then lower the temperature to 375°F. During roasting, baste the cheesecloth-covered turkey every 30 minutes. In the final 45 minutes of roasting, remove the cheesecloth to evenly brown the turkey. Roast until the breast registers 160°F and the thighs register 170°F. Turkey takes approximately 15 minutes to roast per pound. Once the turkey is at temperature, remove it from the oven and allow the turkey to rest for 20-30 minutes. The turkey will continue to roast from the residual heat, bringing the breast to 165°F and the thighs to 175°F. Once the turkey has rested, carve and serve.
Video

Notes
Nutrition
Nutrition information is automatically calculated, so should only be used as an approximation.

Did you make this? Leave a comment below!


This is a keeper. This turned out excellent!!!! Everyone loved it!! It was so moist and flavorful and fairly simple to do!! Thank you Wyse Guide!!!!!
I had never tried a dry brine and this recipe yielded a wonderful juicy turkey
I just left a note on the YT video. Best we’ve ever made, and our news gold standard method.
excellent !!
I’ve been searching for a perfect turkey recipe and this is it!! After several years of ‘just ok’ turkeys on Thanksgiving, I used this recipe yesterday and it was great!!! Everyone loved it and the turkey was beautiful! I also appreciated the video instructions. Thank you Kaleb!
Second Thanksgiving making this recipe and it came out deliciously flavorful and moist. Thank you for a well written, easy to follow recipe.
Perfection!!!